How to Build Your Employee Directory in Microsoft Excel (Plus Free Template)
In this comprehensive, beginner-friendly guide, we'll walk you through how to create a tailored employee directory spreadsheet from scratch using Excel.

Keeping track of your team, their roles, and contact information is crucial for any organization.
An Excel-based employee directory offers a simple way to organize and manage staff details all in one place.
In this comprehensive, beginner-friendly guide, We'll walk you through how to create a tailored employee directory spreadsheet from scratch using Microsoft Excel.
You'll learn step-by-step how to structure your workbook, populate it with your staff data, add features like filters and formatting, and customize your people directory to suit your needs.
Let's get going...
Step 1: Organize Your Employee Information
Before you start creating your employee directory in Microsoft Excel, the first step is to organize all the relevant employee information. This could include their names, job titles, contact details, start dates, and any other critical details about each employee.
Make sure that the information you collect is accurate, up-to-date, and easy to manage.
Step 2: Open a New Excel Workbook
Once you’ve organized the information, create a new workbook in Microsoft Excel. To do this, open Excel and click on “File” then “New Workbook.” This will create a blank workbook where you can start designing your employee directory.
Step 3: Set Up Your Column Headers
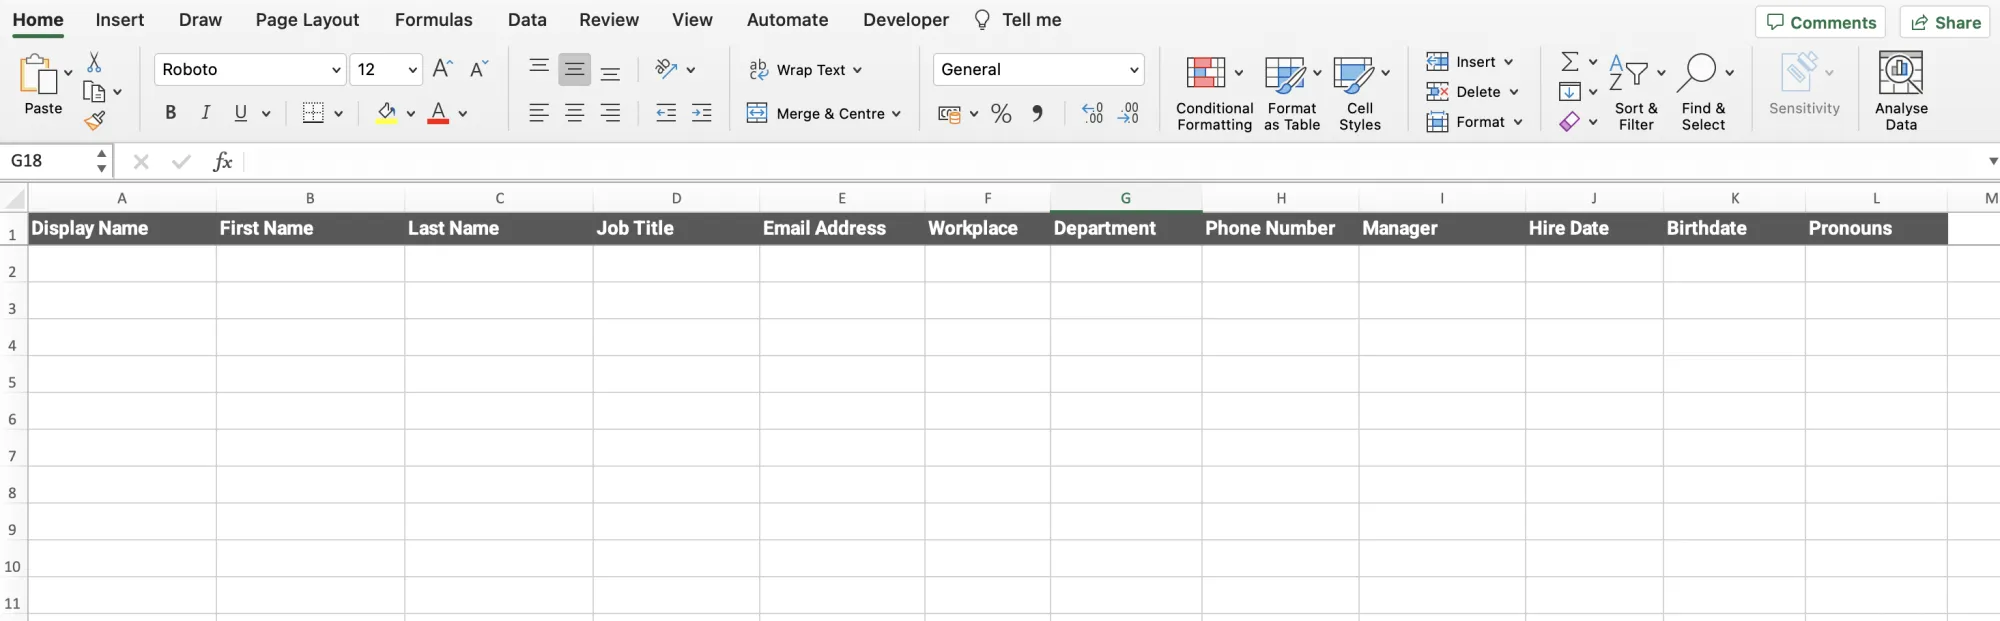
Start by labeling your column headers with the types of information you want to include in your directory. We recommend using the following fields and structure:
- Rename Sheet1 at the bottom to "Employees"
- In cell A1 type "Display Name"
- In cell B1 type "First Name "
- In cell C1 type "Last Name"
- In cell D1 type "Job Title"
- In cell E1 type "Email Address"
- In cell F1 type "Phone Number"
- In cell G1 type "Workplace"
- In cell H1 type "Department"
- In cell I1 type "Manager"
- In cell J1 type "Hire Date"
- In cell K1 type "Birthdate Date"
- In cell L1 type "Pronouns"
Feel free to add or remove columns depending on your organization's needs.
Step 4: Format Your Headers
Make your headers stand out by applying some formatting:
- Highlight the header row.
- Choose a bold font and increase the font size.
- Apply a background color to make the headers pop.
- Add borders to separate the columns.
Step 5: Create a Workplace Directory
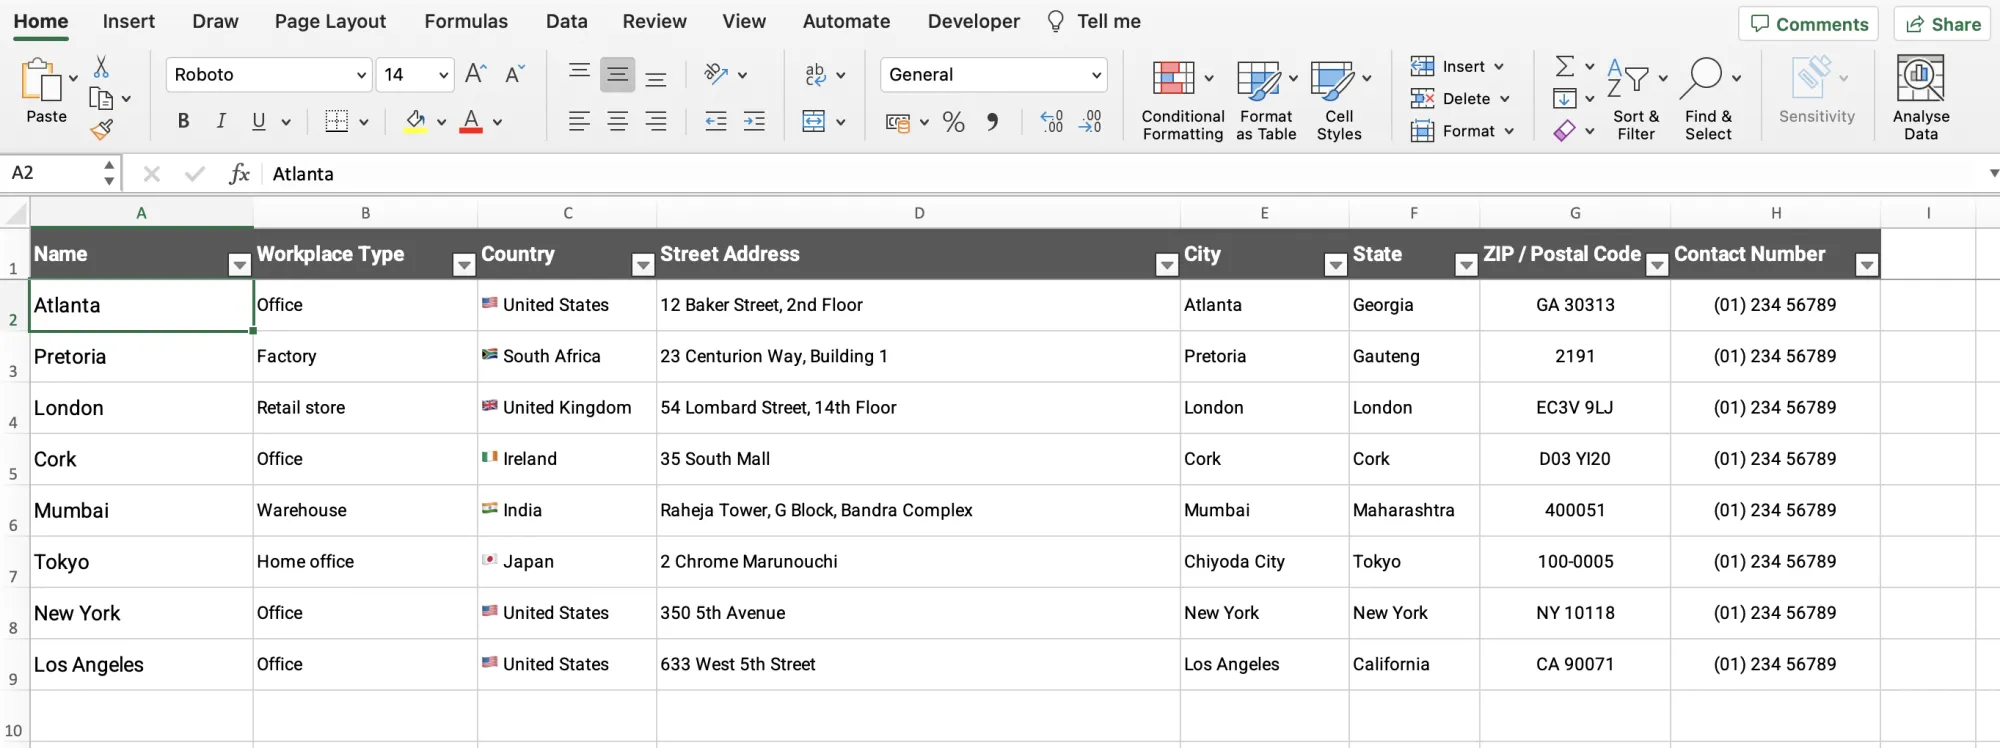
- Create a new sheet called "Workplaces"
- In cell A1 put "Workplace"
- In cell B1 put "Workplace Type"
- In cell C1 put "Country"
- In cell D1 put "Street Address"
- In cell E1 put "State"
- In cell F1 put "ZIP / Postal Code"
- In cell G1 put "Phone Number"
- In cell H1 put "Main Contact Person"
This gives you a directory of your different workplaces and their locations.
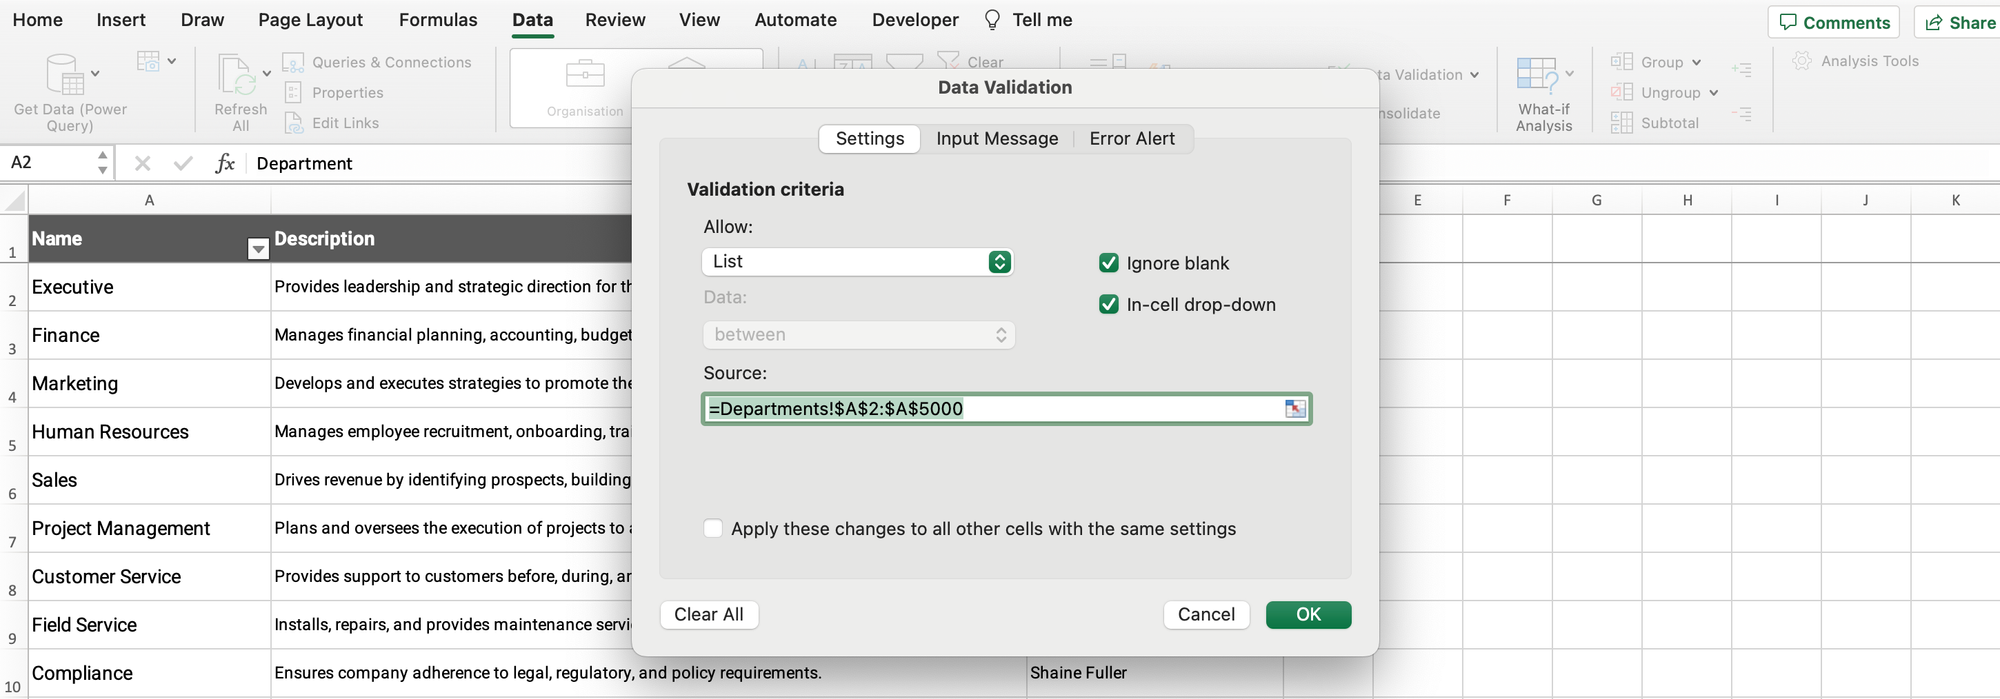
Step 6: Link Workplaces to the Employee Directory
Now you can link this new Workplaces sheet to the Employee Directory using data validation.
- Go back to the "Employees" sheet
- Highlight the Workplace column (Column G)
- Click Data > Data Validation
- Under Validation Criteria, select the "List" option
- Enter =Workplaces!$A$2:$A$500
- Make sure the 'ignore blank' checkbox is ticked
- Make sure the 'in-cell drop-down' checkbox is ticked
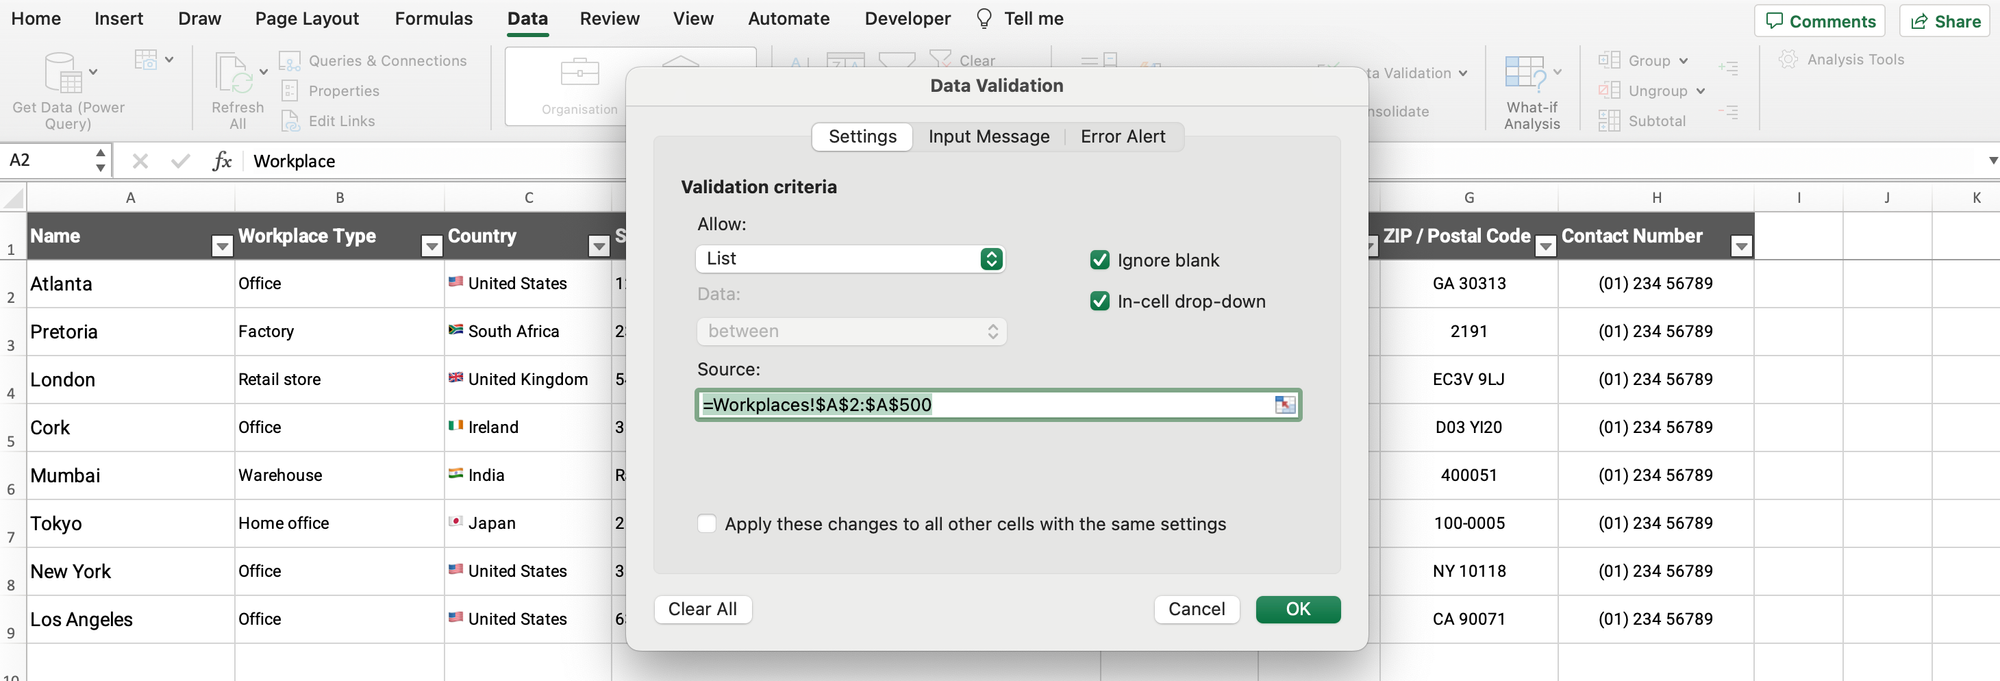
Now the workplace column will pull from the list of workplaces. When adding a new employee, you can select which workplace they belong to from the dropdown.
Step 7: Create a Department Directory
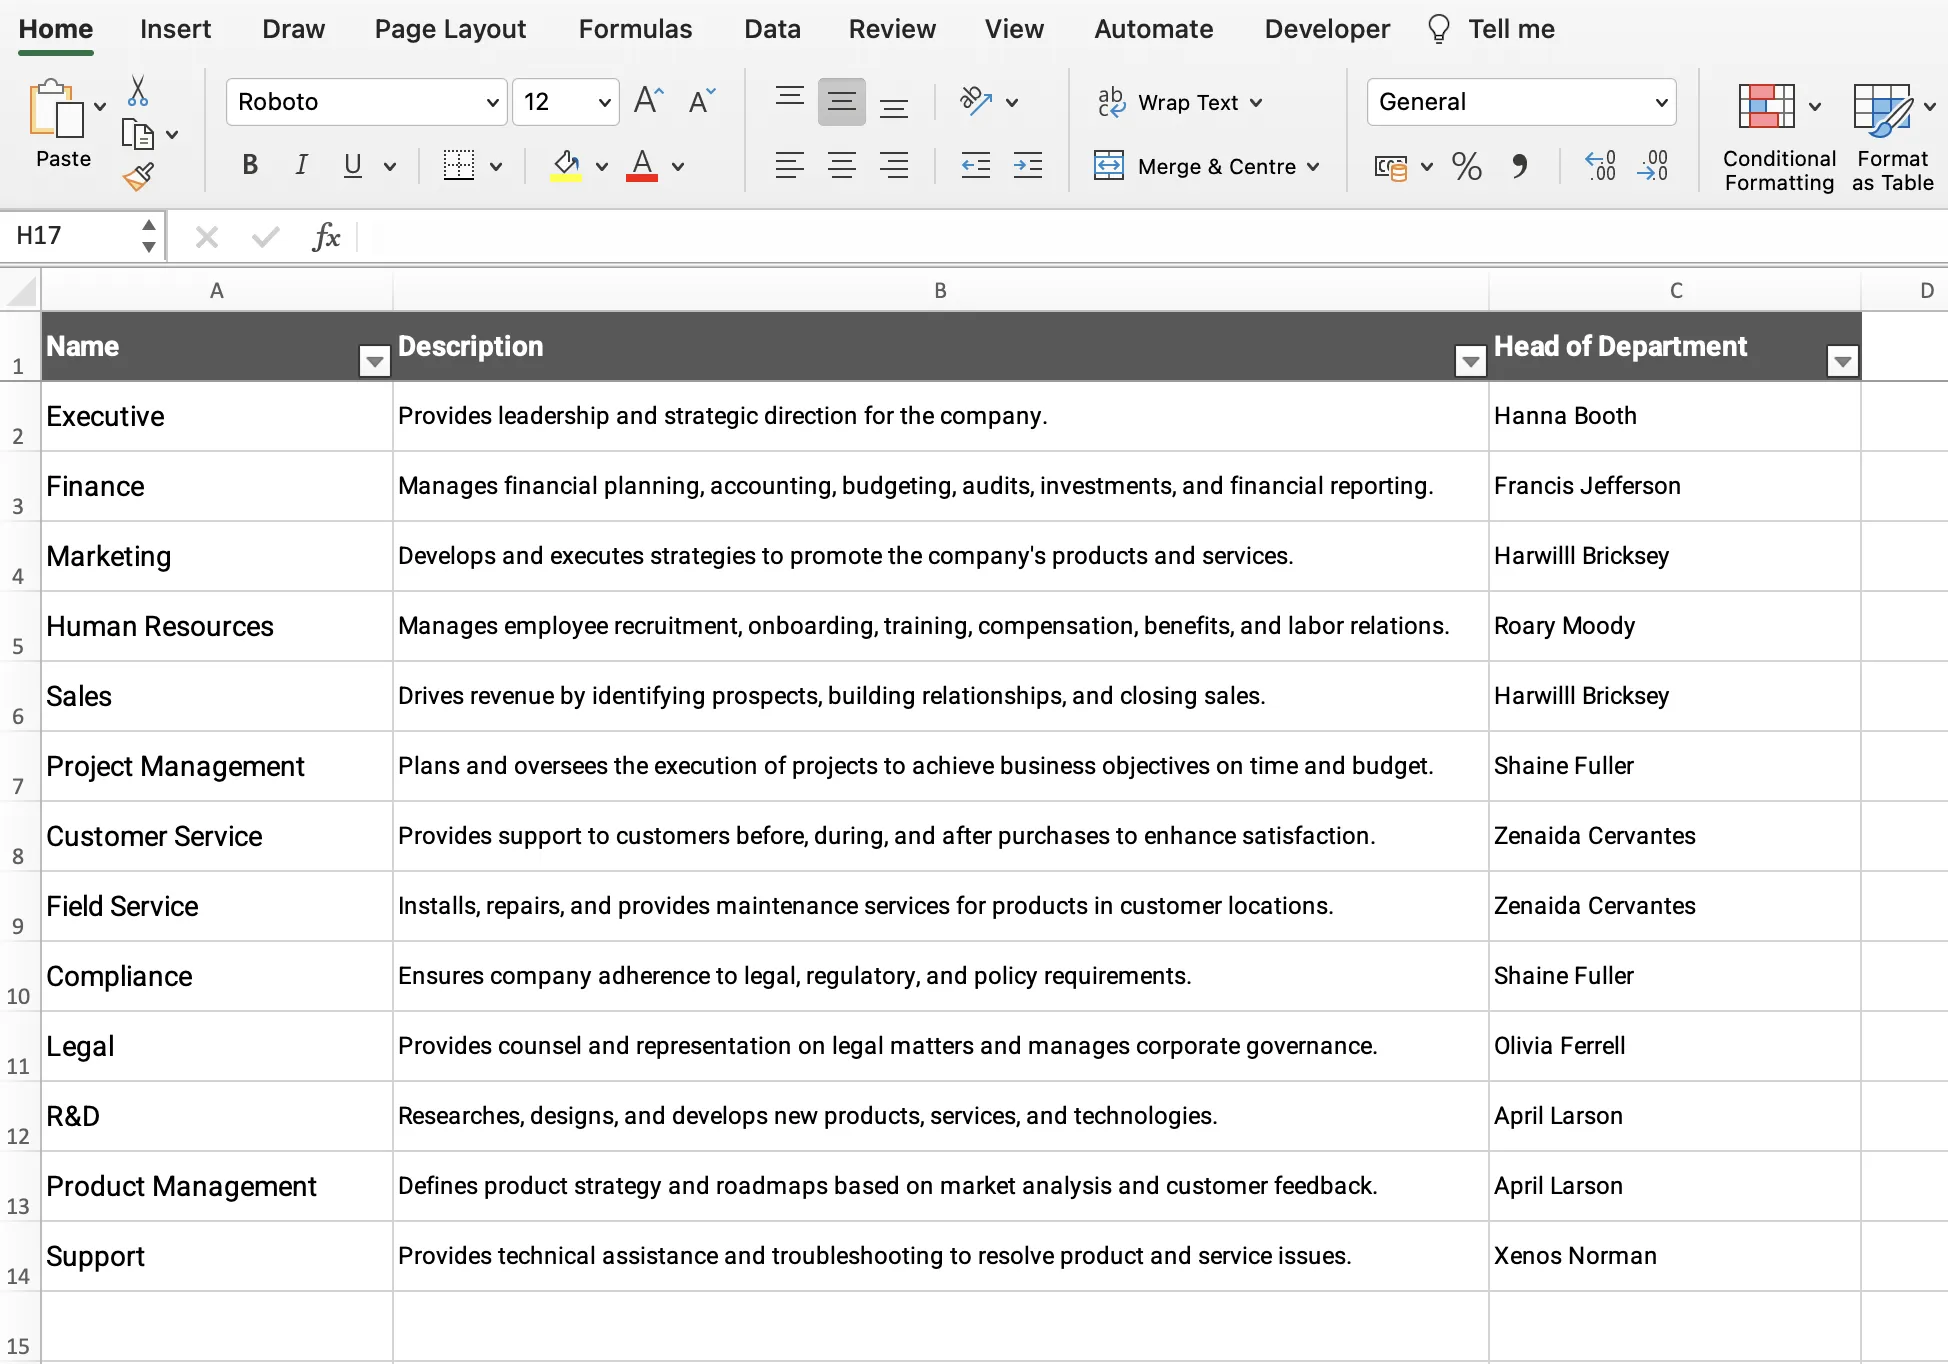
- Create a new sheet and name it "Departments"
- In cell A1 put "Department"
- In cell B1 put "Department Head"
- In cell C1 put "Description"
- In column A, list each department
- In column B, put the name of the department head
- In column C, add the overview description of that department
This gives you a simple directory of all your departments.
Step 8: Link Departments to the Employee Directory
Now you can link this new "Departments sheet" to the Employee Directory using data validation.
- Go back to the Employee Directory sheet
- Highlight the Department column (Column H)
- Click Data > Data Validation
- Under Criteria, select List from a range
- Enter =Departments!$A$2:$A$2500
- Make sure the 'ignore blank records' checkbox is ticked
Now the Department column will have a dropdown list populated from the Departments sheet. When a new department is added to that sheet, it will automatically appear as an option.
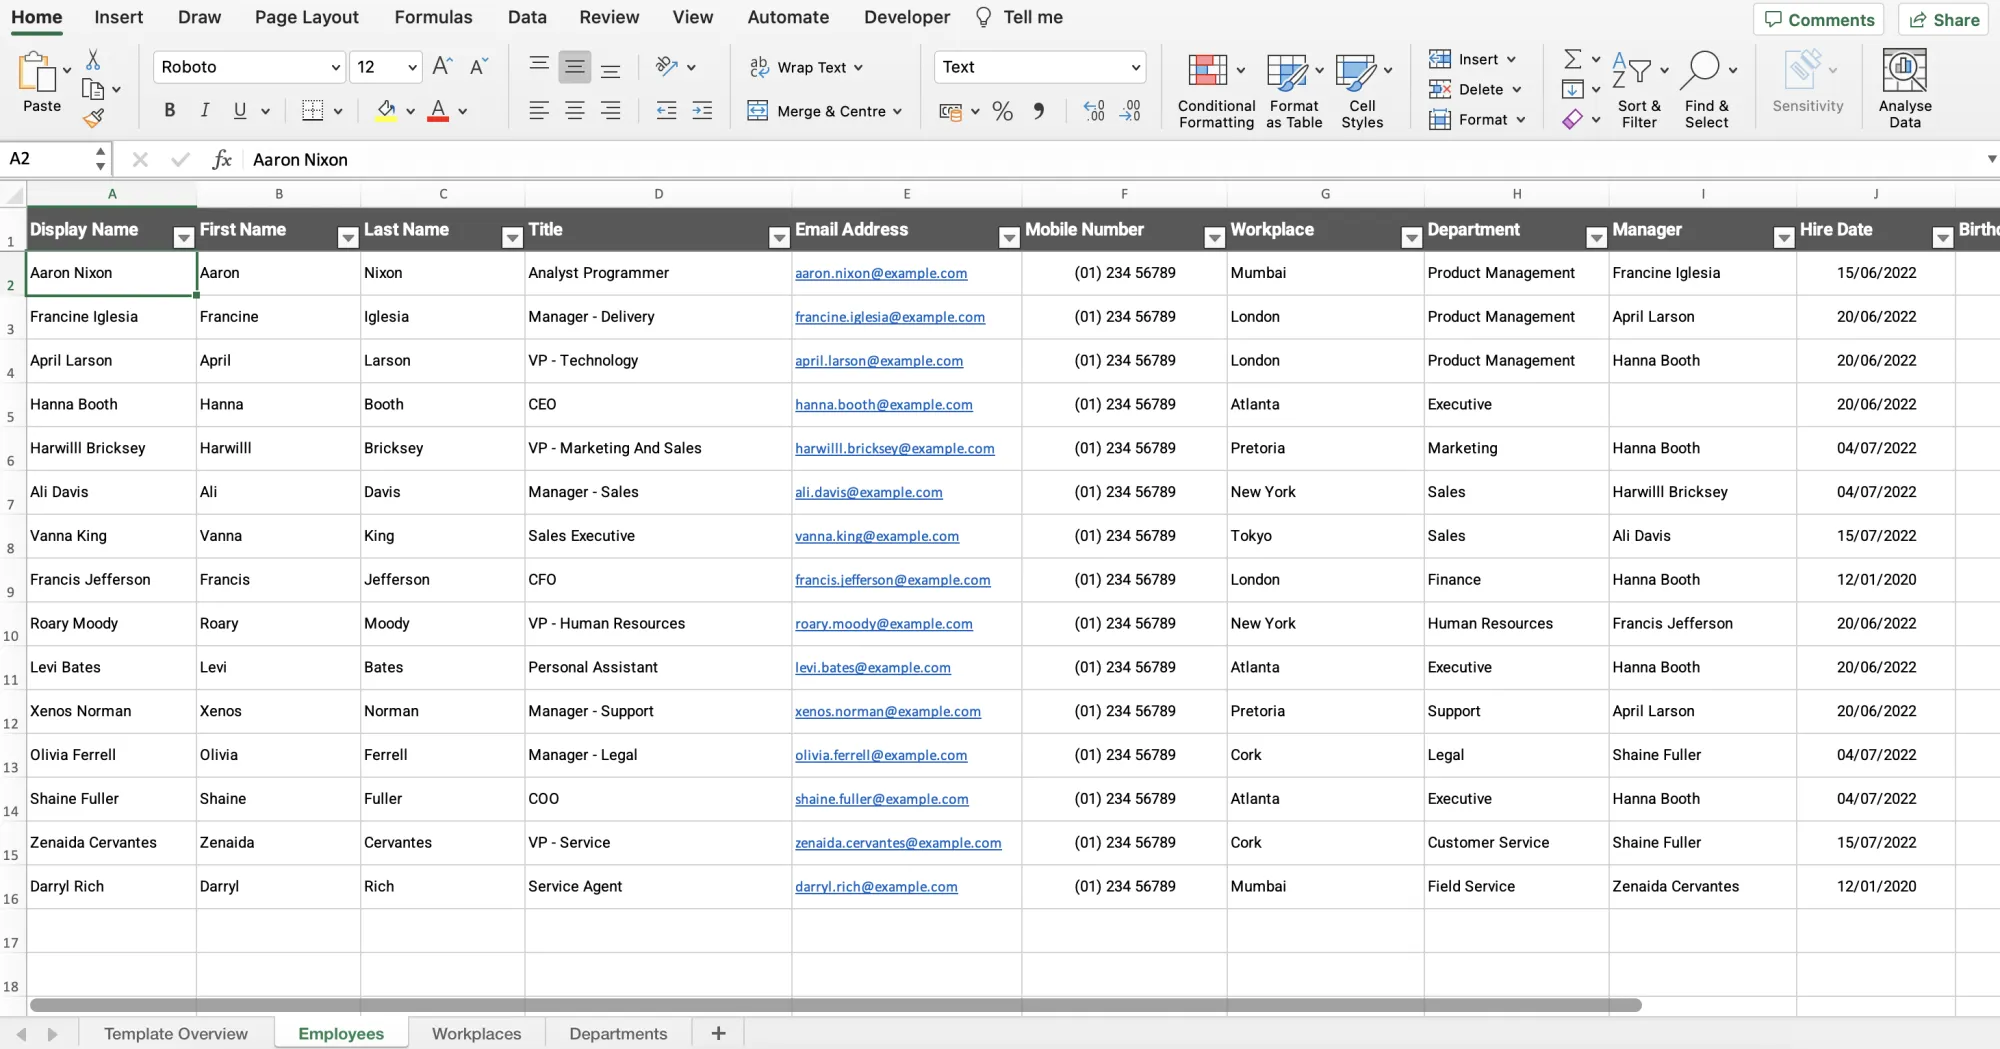
Step 9: Add Employee Data
- Starting in row 2, add a new row for each employee and fill in their data under the appropriate column headers.
- Make sure to use proper capitalization and formatting consistently.
- For phone numbers, use (XXX) XXX-XXXX format.
- For hire date and birthdate, use MM/DD/YYYY format.

Step 10: Format Your Data
To make your Excel staff directory easy to read, apply some formatting to the data:
- Highlight the data row you want to edit.
- Choose a clear, legible font and font size.
- Apply alternating row colors to improve readability.
Follow the steps below to apply some advanced formatting to certain fields in Excel.
How to Format Phone Numbers in Excel
Once you've entered all the phone numbers into your Excel employee directory, take a moment to format those fields so the numbers appear consistently.
By default, Excel will remove any formatting from numbers and display them as general values. So a phone number like 123-456-7890 could show up as 1234567890.
To make phone numbers stand out and be easily scannable, you need to adjust the cell formatting.
- Select the phone number column.
- Click on the Home tab and open the Number Format drop-down menu.
- Select the Special option for phone numbers.
This will add dashes between the numbers so they follow the standard phone number format of 123-456-7890.
You can also customize the format to match your preference:
- Add parentheses around the area code: (123)-456-7890
- Display with a dot separator: 123.456.7890
- Include the country code: +1 123-456-7890
The key is to pick one phone number format and stick with it for consistency throughout your staff directory in Microsoft Excel. Properly formatting the numbers makes the information much easier to parse visually.
How to Format Dates in Excel
In addition to phone numbers, you may also want to ensure any date fields in your Microsoft Excel directory are properly formatted.
Dates can be displayed in a number of different ways. Excel defaults to showing the full date and time (3/14/2020 1:30:00 PM). But for an employee directory, you may likely only need to show the date, not the timestamp. To format the date fields:
- Select the date column
- On the Home tab, open the Number Format drop-down
- Select the Short Date format (3/14/2020)
This will display just the day, month and, year in an easy-to-read format. You can also customize the date format further based on your preferences:
- Display as MM/DD/YYYY
- Use text instead of numbers for the month (Mar 14, 2020)
- Show the day of the week (Friday, March 14, 2020)
The key is to select one date format and use it consistently in all the date fields. This makes scanning and comparing dates much easier.
Step 11: Adjusting Column Widths and Row Heights
Now that you've entered all your employee data and formatted your fields in your Excel people directory, you'll likely need to adjust some column widths and row heights for the best fit.
By default, Excel will set column widths and row heights based on the size of the data in the cells. This can lead to columns being too narrow to fully display text or rows being spaced too far apart. Here are some tips for adjusting widths and heights:
Column Widths
- Hover over the right border of the column header
- When the resize cursor appears, double-click to auto-fit the width based on cell contents
- Alternatively, drag the border to manually adjust the width
Row Heights
- Select the row(s)
- Right-click and choose Row Height
- Enter a value in points to set the height
Be sure to double-check that your data fits within the column widths and that the row spacing looks proportional.
Step 12: Sort and Filter Your Data
Excel has a number of helpful features that can help you organize and analyze your employee data quickly and efficiently.
For example, you can use the "Sort" feature to organize your employee data alphabetically by name, department, or position.
You can also use the "Filter" feature to isolate specific employee data based on certain criteria. Additionally, Excel's "Conditional Formatting" feature can be used to highlight certain data points in your spreadsheet, such as employees who have completed specific training.
- Highlight your entire data table, including headers.
- Click the 'Data' tab and then click 'Filter'.
- Use the drop-down arrows next to each header to sort and filter your data as needed.

Step 13: Freeze the Header Row
To keep your header row visible while scrolling through your Excel employee directory, freeze the top row:
- Click on the 'View' tab.
- Go to the 'Freeze Panes' dropdown menu.
- Select 'Freeze Top Row'.

Step 14: How to Protect Sensitive Information in Excel
It's important to protect sensitive employee information from unauthorized access. You can do this by protecting certain cells or ranges of cells in your spreadsheet.
- To do this, select the range of cells you want to protect.
- Go to the "Review" tab, and click "Protect Sheet."
- Set a password to protect the cells from being edited by anyone without the password.

Step 15: Save and Share Your Directory
Finally, save your directory by clicking 'File' > 'Save As' and choosing a suitable file name and location. Share your masterpiece with your team by emailing the file or uploading it to a shared drive.
And there you have it – your very own employee directory in Microsoft Excel!
Additional Tips
Here are a few additional tips for enhancing your employee directory in Microsoft Excel:
How to Create a Manager Dropdown Field
- Highlight the Manager column (Column I)
- Click Data > Data Validation
- Under Validation Criteria, select the List option
- Select Column A (Display Name)
- This will create a dropdown of all employees in the Manager column
How to Create an Org Chart in Excel
A great addition to your employee directory is an org chart visualizing your reporting structure.
To build a basic org chart, you need to use the following columns
- Display Name (Column A)
- Manager (Column I)
Once you've filled in these two columns, you can generate the org chart:
- Select the data and insert a hierarchical SmartArt graphic
- Choose the "Organization Chart" layout
- In the dialog box, set the Display Name column as the Name field
- Set the Manager column as the Reports To field
- Click OK to generate the chart
This will create a visual representation of who reports to whom in the organization. Names are pulled dynamically from the Display Name column.
How to Add Profile Pictures in Excel
A great way to make your employee directory in Excel more visual is to include profile pictures for each person. Excel allows you to insert and format images in cells.
Here's how to add pictures to the spreadsheet:
- Collect a profile photo for each employee and save the image files in a folder on your computer.
- In the Employees sheet, create a new column called Profile Photo.
- Select the cell where you want the photo to appear in the Profile Phot0 column.
- On the Insert tab, click Pictures.
- Browse to the folder containing the images and select the correct picture for that employee.
- Click Insert.
Get Your Free Excel Employee Directory Template
As you can see from all the steps above creating an employee directory from scratch in Excel can be time-consuming.
Luckily, we have a free Excel employee directory template for you that can give you a head start.
Download your free employee directory template below:
Unsure of Having Your Employee Directory in Excel?
While Excel provides a free and simple way to build a staff directory, it has some drawbacks when used as an ongoing employee database:
- Limited collaboration - Excel doesn't allow for easy sharing and simultaneous editing by multiple users. Version control can become an issue.
- Not optimized for relational data - Excel can only display data in a flat table. It's difficult to establish relationships between entries or build structured org charts.
- Manual upkeep - Any changes to the directory must be manually inputted. There's no simple way to connect Excel to HR systems to sync employee data.
- Feature limitations - Options for access controls, permissions, reporting, and workflows are lacking compared to dedicated directory software.
- Not inherently mobile friendly - Excel spreadsheets are difficult to view and update from mobile devices. Accessing your people directory on-the-go can be problematic.
For these reasons, using modern employee directory software like OneDirectory provides major advantages:
- Powerful people search and filtering
- Comprehensive employee profiles
- Centralized employee profile database
- Automated syncing with Microsoft Entra ID
- Interactive org chart visualization
- Customizable fields and views
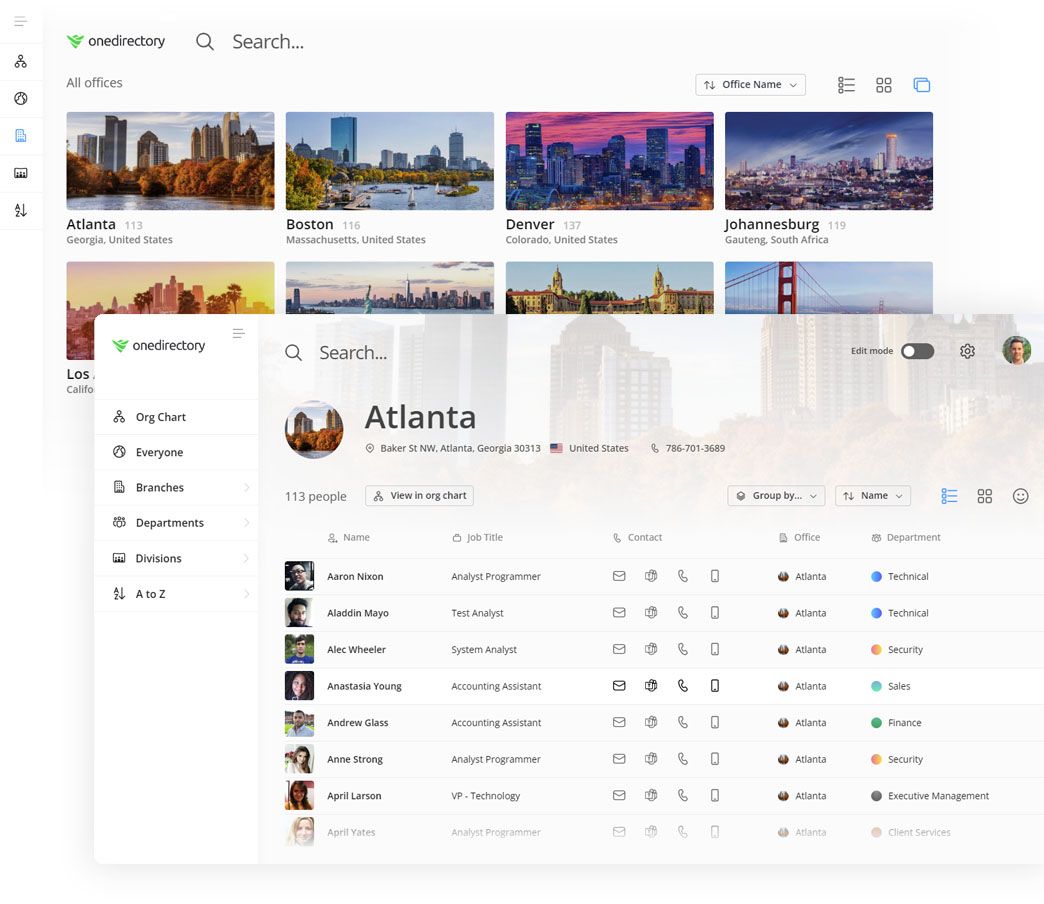
Give OneDirectory a try!
Start by signing up for our 14-day free trial, where you will get to experience all the benefits of OneDirectory's modern employee directory solution.